Oh hi, I still exist

Well, this is embarrassing. I had this successful blog, and people read it, and we all ate deliciously and healthfully. Then I dropped the ball and now I have flax-egg replacement on my face. Rather than making excuses, here is a real quick rundown of the last… year…s?

I traveled around the world:

around the world

I attended a wedding in India of a dear friend:

Wedding

I moved in with the love of my life:

alex and i

My posse of niece and nephews grew:

kids

And then I got ENGAGED to the love of my life:

facebook engaged

And then we traveled the world again:

ThailandAnd finally, as you may know, I have been lucky enough to share my life with two furry critters for the last few years. They were who got me out of bed in the morning and who inspired me to be my best. I have learned some of my most important lessons with my babies and they have been instrumental in helping me figure out where my strengths and priorities are. It is now with great sadness that I share that I have lost them at ripe old rattie ages recently. However, I will never lose that which they helped me gain and it is because of them that I may have and enjoy this next stage of my life as we build our new family. More on this later though…

Bianca collage

A lot more has happened, but this will be a good primer as I ramp this back up. I have grown an unimaginable amount since we last chatted, and I look forward to sharing this you. So pull up a yoga mat, put on some tea, and check all stories and expectations at the door.

Roasted Cauliflower Dip

Image

I have been pretty into dips lately, dips of all kind. Hummus and whole wheat flat bread has been my go-to “I just got home from work and I am hungry and need something to hold me over until dinner”/”I just got out of work and I am starving so I accidentally eat too much dip and then am not hungry for dinner” snack. Oops.  I currently have a spicy avocado hummus in my fridge that I cannot wait to dominate. But, as I am writing up this post, I also wish I had more of this roasted cauliflower dip. But alas, I don’t… because I finished this in maybe 2 sittings. Classic me.

Image

Image

Cauliflower doesn’t get enough attention. Since it is white, it is often assumed that it lacks the nutritional value of its green brethren. However, it is still a cruciferous vegetable that you should consider putting into your weekly mix! Its flavor is a bit subtler, so it is easy to sneak it into more dishes. If you put broccoli into something, it immediately becomes a broccoli dish. But think of cauliflower as more of a healthy blank canvas. In this dip, roasting it intensifies its flavor a bit and is a great canvas for the bright flavors of ginger, lemon, and sesame.  The texture was that of hummus, however it tasted completely different that hummus, in the best of ways. It is also a bit lighter, so you won’t completely ruin your appetite if you have this as a pre-meal snackaroo. I can’t even handle how good this ended up being. And I kind of hate that I am not making/eating this right now.

Image

Roasted Cauliflower Dip

I don’t remember where I saw the inspiration for this, I think maybe in a Huffington Post e-mail?

Materials:

  • 1 head of cauliflower, broken down into flowerets
  • 4 tablespoons olive oil
  • 2 tablespoons freshly minced ginger
  • 4-6 cloves garlic
  • 3 tablespoons tahini
  • 3 tablespoons fresh lemon juice
  • ¼ cup freshly chopped cilantro
  • Whole wheat pita, for dipping shoveling into face
  • Salt and pepper

Methods:

  1. Preheat the oven to 450F.
  2. Toss the cauliflower with the oil, ginger, garlic cloves, and a few shakes of salt and pepper.
  3. Spread mix onto a rimmed baking sheet and roast for 40 minutes, stirring 20 minutes in.
  4. Remove from oven and let cool slightly.
  5. Transfer roasted cauliflower to food processor and add the tahini and lemon juice.
  6. Pulse into well combined and add salt to taste.
  7. Add the cilantro and pulse until just incorporated.
  8. Transfer to bowl and serve eat entirety of bowl with whole wheat pita bread.
  9. Enjoy!
Image

A pretty cloud I saw outside my window while taking these photos :-).

Beet Pesto

DSC_0043

Confession: my life is more or less plagued with inside jokes surrounding beets. Most normal people have a number of beet jokes less than or equal to 1 (p<0.05). The fact that I have multiple probably tells you something about me… anyways, I digress. Wait, as I am typing this I realized I chose beets as my blog header. Blerg.

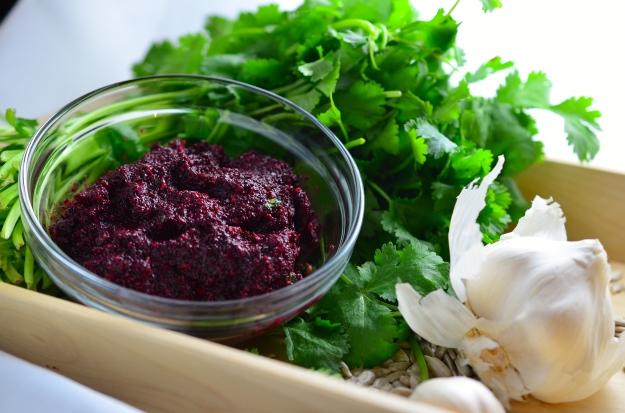
I have stuck to pretty simple things with beets: soups and roasting. But then something magical happened: I put them in my food processor with sunflower seeds, garlic, and cilantro. I had come across a recipe for beet pesto a while ago and I just couldn’t shake the image of the gorgeous magenta sauce adorning some slender noodles. Well, one evening I had diced up some beets and threw them in the oven to put on a salad… but then all of a sudden they were in my food processor! And they were being swirled around in this beautiful food ballet with sunflower seeds, garlic, vinegar, and cilantro. And it was the best thing. Ever.

DSC_0040

Now while making this pesto, my roommate asked me what it has to have to qualify it as a pesto? This was a great question. The Wikipedia has told me that “pesto” means “pounded,” so really any sauce that is made in that way, I suppose, is a pesto. Additionally, it seems ground up nuts/garlic are traditionally at the base of it.

DSC_0045

Side story: US customs almost didn’t let me back in the country coming from Italy due to a jar of pesto in my [checked] luggage. They didn’t bat an eye at the 5 kilos of Parmigiano Reggiano or 4 bottles of wine… but the pesto? Packed next to my stuffed animal? That is some fishy business.

Cheese

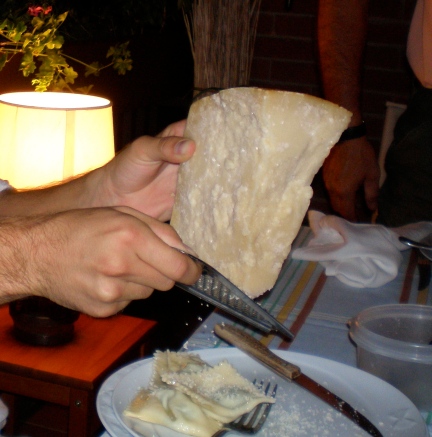
Enjoying parmigiano in Parma at dinner con i miei genitori italiani. Again, of no concern to the TSA.

In conclusion, a pesto is a ground sauce with a base of nuts and garlic that will get you stopped at customs. I hope this answer satisfies.

But back to something that I know will satisfy: this beet pesto. First of all, it is absolutely stunning. It has the most intense/complex/deep magenta/red color that only nature could produce, which my man made words can’t quite give justice to.  Once you have stopped admiring it, you can use it like you would use any pesto: on pasta, as a dip, as a spread on a sandwich, or really anything else you can imagine! Be creative here! All of my trials have been wildly successful. So I plead that you run to your farmers market or grocer and grab a bunch of beets and get to it!

DSC_0048

Beet Pesto

Inspired by A Veggie Venture

Materials:

  • 1 bunch of beets
  • 2-4 cloves garlic
  • 1/3 cup sunflower seeds
  • 1/3 cup cilantro
  • 1 tablespoon white balsamic vinegar
  • ¼ cup olive oil
  • Salt and pepper

Methods:

  1. Preheat oven to 400F.
  2. Wash and peel beets (save the beet tops! Sauté with a little but of garlic and olive oil) and cut into 1/2” cubes
  3. Spread out evening on baking sheet and drizzle with olive oil and a few shakes of salt.
  4. Roast beets for about 20 minutes.
  5. Place roasted beets with all remaining ingredients but the olive oil in a food processor and process until smooth.
  6. Stream in the olive oil until it has reached the consistency you are happy with.
  7. Add salt and pepper to taste.
  8. Enjoy!


Double Chocolate Cupcakes with Salted Caramel Frosting

DSC_0984

I know cupcakes are a bit passé, but I don’t much care. These cupcakes had to happen. And they need to happen over and over. And now they need to happen in your kitchen. And then in your mouth.

I’m going to get straight to the point today. I can’t even handle how good these cupcakes are. R described them as possibly the best thing I have ever made (although didn’t he say that about the jalapeno beer corn bread? Maybe he is just easy to please… or wants to keep me happy so I keep baking…) and N suggested that they might be the best cupcake he has ever had. I tend to agree with both of them. I don’t have much nutritional insight to offer here… since, well… these are cupcakes. They are obviously vegan, and I used olive oil and applesauce in them… and that is about as nutritionally sound as they get. Except that the salted caramel frosting is actually made with anything but. The salted caramel sauce in it used the date caramel you saw in my baked oatmeal. I. Can’t. Get. Enough. I don’t even like frosting (I almost always wipe it off of my cupcakes), and I found myself dipping into the bowl with a spoon. It’s that good.

DSC_0978

DSC_0971

Here’s the skinny/fat/whatever: high quality chocolate riding the silky olive oil express straight to your mouth. You can’t necessarily taste the olive oil, but I know its in there, and it makes me happy. They are super chocolaty and every bit as light. For something as decedent as these, you almost feel lighter after eating them. I bestowed a batch on my roommates this weekend, I bestowed another batch on my lab this morning, and another batch will be presented at book club tonight (for those of you that read this before book club tonight, get pumped). Now it’s your turn to spread the love!

DSC_0967

Double Chocolate Olive Oil Cupcakes w/ Salted Caramel Frosting

Inspired by In Jennie’s Kitchen

Materials:

  • 3 oz Bittersweet Chocolate, roughly chopped (I used Scharffen Berger 62% cacao semisweet)
  • 2 tablespoons Dutch-processed cocoa
  • 3/4 cup Hot coffee
  • 1/2 cup + 1 tablespoon All Purpose Flour
  • 2/3 cup Sugar
  • 1 teaspoon Salt
  • 1 teaspoon Baking Soda
  • 6 tablespoons Olive Oil
  • 1/2 cup Applesauce
  • 2 teaspoons Cider Vinegar
  • 2 teaspoons Vanilla Extract
  • One batch of salted caramel frosting (see below)

Methods:

  1. Preheat oven to 350F and line cupcake tin with 12 paper liners.
  2. In a large bowl, pour the hot coffee over the chocolate and cocoa powder and mix until melted and smooth (if all of the chocolate doesn’t melt, pop it in the microwave for about 30 seconds).
  3. In another bowl, combine the flour, sugar, salt, and baking soda and whisk to combine.
  4. In a third bowl, combine the olive oil, apple sauce, cider vinegar, and vanilla and whisk to combine.
  5. Add half of the flour mixture and half of the liquids to the chocolate and mix for about 1 minute (the color should lighten slightly as the vinegar reacts with the baking soda).
  6. Add the remaining flour and liquids and mix for an additional 2 minutes.
  7. Fill prepared cupcake liners 3/4 full and bake for 18-20 minutes until an inserted toothpick comes out clean, remove from oven. Leave in the pan to cool for 5 minutes before turning out to cool completely on a wire rack.
  8. One the cupcakes have completely cooled, swirl the salted caramel frosting (I used a wilton 35 closed star tip) on as you see fit.
    • It is also acceptable to pipe frosting directly into mouth here.
  9. Optional: drizzle on some melted chocolate and sprinkle on some flakey sea salt.
  10. Enjoy!

DSC_0982

Salted Caramel Frosting

Materials:

For the Caramel Sauce

  • 10 medjool dates, pitted
  • 1/2 cup coconut milk
  • 1 teaspoon vanilla extract
  • 1 teaspoon salt

For the Frosting

  • 1/4 cup nonhydrogenated vegan margarine
  • 1/4 cup nonhydrogenated vegan shortening
  • 1-2 cup powdered sugar
  • 1/4-1/2 cup salted caramel sauce

Methods:

To Make the Caramel Sauce

  1. Place pitted dates in food processor and blend until they form a big ball.
  2. Add the milk, vanilla, and salt and process until smooth and creamy.

To Make the Frosting

  1. Bring the margarine and shortening to room temperature.
  2. Beat the margarine and shortening together in a stand up or hand mixer on high until light and fluffy, about 1-2 minutes.
  3. Reduce speed to low and slowly start adding in the sugar until desired consistency is reached (another 2 minutes).
    • It may take on the look of coarse sand when you first add the sugar, but keep beating and it will turn into fluffy frosting.
  4. Add the caramel sauce, more or less depending on more caramely you want it, and beat for an additional 2 minutes.

DSC_0994

Breakfast Breakdown: Caramel Apple Baked Oatmeal

DSC_0896

You know how pancakes are really just an excuse to have cake for breakfast? Or how a muffin is really just a slightly disheveled cupcake that forgot its hat? I often can’t tell if folks are actually fooled, or just casually ignore these excuses. But one thing I think we can all agree on is that you never eat pancakes for breakfast and then feel good about that decision a couple of hours later. Well, make excuses no more! Today I am here to tell you that you can have caramel apples for breakfast. Say whhaatttttt?

DSC_0901

Of course, I am going to insist that the caramel apple goodness is mixed with oatmeal and then baked first, but I promise you this is something you will thank me for. This breakfast is great for a Sunday brunch or could even be swung on a weekday I could imagine (stumble to the kitchen, throw it all in the baking dish, and then allow it to bake while you get ready and presto: you exit the shower to a warm cinnamon caramel apple towel wrapping you with delight). You get all the taste sensations of a caramel apple, but all of the healthy goodness of hearty oatmeal. The fiber rich oatmeal gets your digestive system off on the right foot and helps slowly release the natural sugars into your bloodstream to fuel you for the day.

DSC_0927

Oh, and speaking of sugar: there is no added sugar! Ummmm, doesn’t she know that caramel IS sugar? Not when it is made out of dates! I had bought dates to sweeten some oatmeal muffins last weekend, and in a stroke of brilliance, decided to whip up some “date caramel” to turn my apple oatmeal into caramel apple oatmeal. I can’t even handle how brilliant I am sometimes. I highly suggest putting this date caramel on… on… well, really anything! I also added some ginger and dried lemon peel to cut through the luscious caramel apple and give the dish some brightness. Top it off with warm and freshly frothed almond milk and your body will be thanking you all day long!

DSC_0888

Caramel Apple Baked Oatmeal

Serves 2 a Hearty Breakfast

Materials:

For the Oatmeal

  • 1 cup rolled oats (I use a nice mix of oats, barley, kamut, rye)
  • 1 teaspoon cinnamon
  • 1/2 teaspoon nutmeg
  • 1 teaspoon dried lemon peel
  • 4 tablespoons ground flaxseed
  • 1/3 cup sunflower seeds
  • 2 apples, peeled, cored, and diced
  • 1 cup almond milk (divided into 2)
  • 1/2 cup applesauce
  • 1/2 cup date caramel (recipe below)

For the Date Caramel

  • 6 medjool dates, pitted
  • ½ cup water
  • 1 teaspoon vanilla

Methods:

To Make the Date Caramel

  1. Place dates in food processor and process until they start to form a ball
  2. Stream in water and vanilla.
    1. You will have to stop and use a spatula to move the caramel from the sides.
    2. Process until smooth.

To Make the Oatmeal

  1. Preheat oven to 350F and grease small baking dish.
  2. Mix together oats, spices, flaxseed, and sunflower seeds in a medium bowl.
  3. In another bowl, mix together ½ cup almond milk, applesauce, ¼ cup caramel, and apple.
  4. Add the wet ingredients to the dry and mix until combined.
  5. Pour into baking dish and bake for 30 minutes.
  6. Spoon into individual bowls and top with remaining caramel sauce and almond milk.
  7. Enjoy!

DSC_0929

[Lentil and Chard] Soup is Delicious.

I feel like long ago, at the beginning of this blog, I had a whole post about how I didn’t really like soup. And now I feel like all I post are soups! But there is something to it, soup is SO versatile and with a little finesse it is a great go-to for a complete balanced meal. And it’s delicious. As an added bonus, soup calls for 1 pot and minimal clean up (you can clean any accessory items while the soup is simmering). Once your timer goes off, all that is left to do it sit back and enjoy said soup. Piece of cake, eh? Er…spoonful of broth? Just doesn’t have to same ring to it…

DSC_0681

This soup knows what’s up. I’m convinced that any human could live off of this soup alone. Swiss chard is a powerhouse of nutrition. Remember how a few posts ago I was talking about the phytonutrients in beets that gave them the awesome red color that so draws our eyes to them? Where else you have seen that color? Oh right, in the stalks of chard! Bingo. Nature has this really great way of using visual clues to tell us what to eat.  Chard is a chenopod and is in the good company of spinach, beets, and quinoa, all known for being particularly nutritious. Lentils then come in smooth it out with their friends: iron, protein, and fiber.  This is a one-stop shop for a filling, tasty, and nutritious dinner. Feel free to play with this recipe with whatever you have on hand, perhaps kale for the chard or chickpeas for the lentils? Let your pantry and taste buds decide!

DSC_0695

Lentil and Chard Soup

From the Artful Vegan

Materials:

For the Soup

  • 2 teaspoons olive oil
  • 1 red onion, finely diced
  • 8 cloves garlic, minced
  • 2 tablespoons freshly minced ginger
  • 2 teaspoons cumin
  • 2 teaspoons thyme
  • ½ teaspoon allspice
  • 4 bay leaves
  • ¼ dry sherry
  • 2 cups canned tomatoes
  • 2 teaspoons balsamic vinegar
  • 2 teaspoons sugar
  • 6 cups vegetable broth
  • 1.5 cups cooked green lentils
  • 4 cups loosely packed chopped red swiss chard
  • ¼ cup white miso

For the Garnish

  • ½ walnuts
  • zest from 1 lemon
  • juice from 1 lemon

Methods:

  1. Heat olive oil over medium heat in a large stock pot.
  2. Add onion, garlic, and ginger and sauté for 5-10 minutes until lightly browned.
  3. Add spices and stir constantly for about 2 minutes.
  4. Stir in tomatoes through lentils, cover, and simmer for 30 minutes.
  5. Add chard and continue to simmer until chard has wilted, about 10 minute.
  6. Whisk in miso.
  7. Prepare the garnish by pulsing the walnuts, lemon juice, and lemon zest in a food processor until they are well incorporated, but the walnuts still hold some shape… we aren’t making walnut butter here!
  8. Ladle soup into bowls and top with 1 tablespoon of walnut garnish.
  9. Enjoy!

DSC_0696

New Year, New Blog

I am the worst. I know. Not even going to make an excuse.

DSC_0557

Ok, maybe a little excuse. I bought veggiewithacause.com, and my lovely SO has been kindly helping me move my blog over there. Hence this staging environment. He told me to make it aesthetically how I wanted, and then he would do the magic internets stuff. So that is where that is. Please let me know what you think of this design! Stay tuned!

Another little excuse, or perhaps pity party I am going to invite you to… is that I have had quite a run disappointing meals. A combination of uninspired, not particularly photo worthy dishes, and with the sun setting before I leave lab has made it tricky.

But these are all excuses, I know. And I want to kick off 2013 with a delicacy that I was quite smitten with. On the day of New Years Eve, the boy suggested we have ourselves a little tea party. And what is a tea party without a proper tea set, petit fours, and finger sandwiches?! No tea party that I want to take part in. I started a few days in advance on the petit fours, since they turned out to be pretty labor intensive… but TOTALLY worth it. I’m not sure I have ever been so proud of something that I have made. They were just perfect. With those in tow, we set out the morning of New Years Eve to buy a tea set, and walked away with an adorable cast iron teapot and cups that looked good for temperature control. One more stop at the grocery store for finger sandwich ingredients, and we were on our way! Our little tea party went swimmingly. My fingers were the appropriate temperature the whole time and our cups didn’t conduct heat in such a way that burned our fingers one bit. Nope, went just how we planned and it was exactly what we wanted.

DSC_0584

DSC_0596

All of that being said, let’s get down to business. I will put it out there up front that these are labor intensive, but I promise you get each ounce of sweat back in pleasure upon seeing and tasting the finished product. And my oh my are they delicious and sinfully decant. Without really being sinful at all, as they are completely vegan! They are tiny little bundles of joy (I know, most people feel this way about kids… I feel this way about little cakes, no big).  And I love them.

To the recipe!

DSC_0568

Petit Fours

Adapted from Vegan Yum Yum

Materials:

For the Cake

  • ¼ cup cornstarch
  • 2 ¼cups AP flour
  • 1 ½ cups sugar
  • 2 teaspoons baking powder
  • ½ teaspoon baking soda
  • ¾ teaspoon salt
  • 6 tablespoons earth balance
  • 2 tablespoons fresh lemon juice
  • 1 cup water
  • ¾ cup almond milk
  • 2 teaspoon vanilla extract
  • zest from 1 whole lemon

For the Filling

  • 1 cup raspberry jam, warmed (I literally microwaved a car of smuckers)

For the Glaze

  • 8 oz vegan semi-sweet chocolate chips
  • 1 tablespoons corn syrup
  • ½ cup coconut oil

Methods:

To make the cake

  1. Preheat oven to 350 degrees and grease a 12 x 17 jelly roll pan liberally.
  2. Sift together all of the dry ingredients (this is important as you want a light cake with a tight crumb).
  3. In a stand-up mixer, add in earth balance, lemon juice, and water and beat for 1 minute.
  4. Add the remaining ingredients and beat for 1 to 2 more minutes.
  5. Pour batter into jelly roll pan and bake for 30 minutes, or until lightly browned and the top springs back when you touch it.
  6. Allow to cool in pan for 5 minutes and then carefully transfer to cooling rack.

For the layering

  1. Cut off the crispy edges of the cake carefully using a serrated knife.
  2. Cut the cake into four quarters.
  3. Cut each quarter in half horizontally using a serrated knife and taking long slow strokes to ensure you are keeping the knife level and evenly cutting it in half.
    • You should now have 8 even layers, each the size of a quarter of the cake.
  4. Take one layer and carefully spread on jam such that it is lightly and evenly coated and you can still see the cake peaking through.
  5. Top with another layer and repeat the jam application two more times.
  6. Top off with one final layer, so that you know have 4 layers of cake with 3 layers of jam.
  7. Repeat process with remaining layers of cake. You should now have 2 stacks about 1 ½ inches high, each the size of 1 quarter of the original cake and each with 4 layers of cake and 3 layers of jam (2 stacks x 4 layers = all original 8 layers are accounted for! Hooray math!)
  8. Carefully wrap each stack in plastic wrap and place in refrigerator overnight.

To transform them into petit fours

  1. Get your stacks out of the fridge.
  2. Measure a 1 ½ inch grid on the surface of each stack using a ruler(you should get 12 squares out of each stack and you will probably have to trim the sides a bit to make the stack exactly 4.5 inches across and 6 inches lengthwise).
  3. Cut the stack along those grid lines using your trusty serrated knife so that you have 24 total perfect 1 ½ inch cubes of layered caked.
  4. Melt the chocolate and coconut oil over the double boiler.
  5. Add corn syrup and stir until melted and blended.
  6. Set up your dipping stations:
    • Bowl with melted chocolate
    • Cooling rack with newspaper underneath
  7. Now, carefully dip each cube into the melted chocolate, side-by-side and finishing with the top, and then set onto cooling rack, with newspaper underneath to catch the dripping chocolate.
  8. Place in refridgerator to allow chocolate glaze to harden.
  9. Enjoy! I enjoyed mine with some green tea, tea cups that burned my fingers, and the best of company :-). DSC_0575

Beet Soup (not Borscht!)

It pains me to say it, but the truth is that fall is approaching. Oh, except that I live in the Bay Area and it is fall weather. All. The. Time. Nothing like wearing a light sweater everyday of your life. But i’m not bitter, I swear… I love being cold.

Fall weather calls for fall food. Something earthy and warm, like a soup. A soup made from beets. Borscht is a little old hat, so I was excited when my mom sent me a recipe for a beet and apple soup. I just couldn’t resist the smooth bright magenta hue of the simple soup. I had one apple leftover from an apple pie I made on Sunday morning and had picked up some beets at the farm stand, so Sunday evening seemed like the perfect night for this soup.

The soup is simple and made my whole body smile. A big magenta stained smile. The color of the soup does more than please the eye, it pleases the whole body. The phytonutrients that give the root its awesome color is also a power house of antioxidant, anti-inflammatory, and detoxification properties for your body. Oh, and don’t be too concerned with the… uh… after math. It looked like I killed someone in my kitchen. NBD. And don’t thrown away those beet greens! They are equally nutrient packed and taste great lightly sautéed with some olive oil and garlic. 

Beet and Apple Soup
Adapted from Beet and Apple Soup
Materials: (Makes dinner for 2)
  • 3 beets
  • 1 granny smith apple
  • 1 small onion
  • 4 cups vegetable stock
  • 2 tablespoons white balsamic vinegar
  • salt and pepper
  • 1/2 cup cashew cream
  • 2 tablespoons prepared horseradish
Methods:
  1. Peel and roughly chop the beets, apple, and onion.
    • NOTE: before chopping the beets, thinly slice off about 10 thin slices to pan fry to garnish.
  2. Toss beets, apple, and onion in a stock pot with vegetable stock.
  3. Bring to a boil, reduce to a simmer, and cook, covered, for 30 minutes.
  4. In the meantime:
    • Combine the cashew cream and horseradish.
    • Heat 2 tablespoons of olive oil in heavy bottom skillet and pan fry beet slices for about 3 minutes on either side, until crispy.
  5. Remove soup from heat and allow to cool for 5-10 minute.
  6. Transfer the soup, in 2-3 batches, to food processor, and process until smooth.
  7. Return to stove, add vinegar and season to taste with salt and pepper, and heat on low for about 10 additional minutes.
  8. Ladle into bowls and top with horseradish cream and crispy beets.
  9. Enjoy!
    • Can be served hot or at room temperature, depending on how chilly of a fall day it is!


Boozy cupcakes

Happy Monday! As a tribute to the weekend that we are now mourning (when just mere hours ago you were sipping a craft beer chatting about who-even-cares with your besties, and now you find yourself back in your cubicle)… I bring you cupcakes! Boozey cupcakes! Who doesn’t love boozey cupcakes? The alcohol cooks off, it doesn’t taste that strongly of booze… but just knowing that it is in there makes the whole experience a little better. And hopefully it will transfer you back, even if just for a moment, to that creaky porch or crowded bar.

I know I spoke of these noble conquests of bringing you a plethora of cupcakes. And I know that I have not done that. Honestly though? These cupcakes have not stuck around long enough to photograph them. The cupcake of which of speak, that I am here to share with you, are chocolate stout cupcakes. In the spirit of being a manly cupcake, they aren’t overly sweet and are not loaded with some fluffy or frilly frosting. Nope, none of that. The chocolate and stout really take the main stage here… and trust me, you wouldn’t want it any other way. And that main stage is a cloud. A chocolatey cloud floating in a river of beer. Mmmmmm.

As an aside, you are getting this recipe now because I noticed on Saturday morning that there were still 3 cupcakes left from the batch I had made a couple of days before. I was waiting for my barley to cook and jumped at the opportunity. So there I sat, unshowered, squatting by my coffee table in front of the window with my camera in one hand and powdered sugar sifter in the other. Do you know how difficult it is to get a good shot while trying to shake the powdered sugar in one hand and snap the photo with the other? That is how eager I was to share these cupcakes with you! So go forth, my friends, and make these boozy cupcakes.

Chocolate Stout Cupcakes
Materials:
For the Crumb Topping
  • 1/4 cup dutch processed cocoa powder
  • 1/4 cup flour
  • 1/4 cup sugar
  • 2 tablespoons canola oil
For the Cupcakes
  • 1/2 cup non-dairy milk
  • 1 teaspoon apple cider vinegar
  • 1 cup + 2 tablespoons flour (I used half AP and half whole wheat)
  • 1/3 cup dutch processed cocoa powder
  • 1/2 teaspoon baking soda
  • 1/2 teaspoon baking powder
  • 1/4 teaspoon salt
  • 1/2 cup stout
  • 3/4 cup sugar
  • 1/3 cup canola oil
  • 2 teaspoons vanilla
  • Powdered sugar for dusting (optional)
Methods:
  1. Preheat oven to 350F and line muffin pan with paper liners.
To make the crumb topping…
  1. Combine the cocoa power, flour, and sugar.
  2. Slowly drizzle in the oil while tossing with a fork until crumbs form.
  3. Once all the oil has been added, toss and stir the crumbs with your fingers for about 30 seconds.
To make the cupcakes…
  1. Whisk together the milk and vinegar in a large bowl and set aside.
  2. In a separate bowl, combine the flour, cocoa powder, baking soda, baking powder, and salt.
  3. Add the stout, sugar, oil, and vanilla to the milk and beat until foamy.
  4. Add the dry ingredients to the wet in two batches and beat for about 2 minutes.
  5. Pour batter into liners until about 3/4 full.
  6. Gently sprinkle with crumb topping so that the crumbs rest on top.
  7. Bake for about 22 minutes.
  8. Once cooled, you can dust with powdered sugar.
  9. Enjoy!

Lazy Saturday

Saturday mornings are always met with excitement and a twang of bewilderment. The excitement comes in because I have the time to leisurely make myself a nice brunch, but at the same time, I spend most of my weak cramming down bites of oatmeal between hairbrush strokes so I can get out the door on time, so it takes a little bit of effort to break that habit.

As a nod to this week’s lecture on carbohydrates with an emphasis on whole grains and fiber, I decided to fill my belly with those things on this morning. I originally headed into the kitchen to make a breakfast quinoa bowl, to find my quinoa stash had been depleted. However, staring up at me from my pantry was a hearty bag of barley. One great reason to have a fiber heavy breakfast is that is keeps you full and helps prevent your blood glucose from spiking. The soluble fiber absorbs water and turns your stomach contents into a gel, and forces your body to slow down and digest everything appropriately. Since your stomach contents are emptying slower, and are buffered by fiber, glucose will be released much slower, making you feel better and aiding in insulin sensitivity. While the soluble fiber is doing its thang, the insoluble fiber acts as natures pipe cleaner to keep your GI tract clean and your colon happy.

I bet your digestive tract is smiling just reading that above paragraph!

Anyways, back to the stuff that happened between me finding the barley, and satisfied, pushing away an empty bowl, a little sticky from peach syrup.

I par cooked the barley in a pretty standard way. While barley cooked away, I stewed up a diced peach in coconut oil and maple syrup with some raisins. When the barley was almost there, I transferred it to the stewed peach mixture, added almond milk, and then let it simmer for a bit longer. Garnished with slivered almonds, coconut flakes, and some fresh almost milk.

Ya, so that just happened. Everything worked in perfect harmony and has left my body charged for the day ahead.

Coconut Peach Barley Breakfast Bowl
Materials:
  • 1 cup pearl barley
  • 2 cups water
  • 1 tablespoon coconut oil
  • 1 tablespoon maple syrup
  • 1 peach, diced
  • 1/2 cup raisins
  • 1 cup non-dairy milk of choice
  • slivered almonds, for garnish
  • flaked coconut, for garnish
Methods:
  1. Combine the barley and water in a small pot, bring to a boil, and simmer for 25-30 minutes.
  2. While the barley is cooking, melt the coconut oil and maple syrup in another pot over medium heat.
  3. Add the peaches and raisins and cook until the peaches are soft and the raisins have plumped up, maybe 5 minutes.
  4. Once most of the water has been absorbed by the barley, transfer it to the pot with the peaches.
  5. Add 1/2 cup of the non-dairy milk and simmer for an additional 15 minutes.
  6. Spoon into bowl, and top with almonds, coconut, and additional milk.
  7. Enjoy!