Category Archives: Mediterranean

Roasted Cauliflower Dip

Image

I have been pretty into dips lately, dips of all kind. Hummus and whole wheat flat bread has been my go-to “I just got home from work and I am hungry and need something to hold me over until dinner”/”I just got out of work and I am starving so I accidentally eat too much dip and then am not hungry for dinner” snack. Oops.  I currently have a spicy avocado hummus in my fridge that I cannot wait to dominate. But, as I am writing up this post, I also wish I had more of this roasted cauliflower dip. But alas, I don’t… because I finished this in maybe 2 sittings. Classic me.

Image

Image

Cauliflower doesn’t get enough attention. Since it is white, it is often assumed that it lacks the nutritional value of its green brethren. However, it is still a cruciferous vegetable that you should consider putting into your weekly mix! Its flavor is a bit subtler, so it is easy to sneak it into more dishes. If you put broccoli into something, it immediately becomes a broccoli dish. But think of cauliflower as more of a healthy blank canvas. In this dip, roasting it intensifies its flavor a bit and is a great canvas for the bright flavors of ginger, lemon, and sesame.  The texture was that of hummus, however it tasted completely different that hummus, in the best of ways. It is also a bit lighter, so you won’t completely ruin your appetite if you have this as a pre-meal snackaroo. I can’t even handle how good this ended up being. And I kind of hate that I am not making/eating this right now.

Image

Roasted Cauliflower Dip

I don’t remember where I saw the inspiration for this, I think maybe in a Huffington Post e-mail?

Materials:

  • 1 head of cauliflower, broken down into flowerets
  • 4 tablespoons olive oil
  • 2 tablespoons freshly minced ginger
  • 4-6 cloves garlic
  • 3 tablespoons tahini
  • 3 tablespoons fresh lemon juice
  • ¼ cup freshly chopped cilantro
  • Whole wheat pita, for dipping shoveling into face
  • Salt and pepper

Methods:

  1. Preheat the oven to 450F.
  2. Toss the cauliflower with the oil, ginger, garlic cloves, and a few shakes of salt and pepper.
  3. Spread mix onto a rimmed baking sheet and roast for 40 minutes, stirring 20 minutes in.
  4. Remove from oven and let cool slightly.
  5. Transfer roasted cauliflower to food processor and add the tahini and lemon juice.
  6. Pulse into well combined and add salt to taste.
  7. Add the cilantro and pulse until just incorporated.
  8. Transfer to bowl and serve eat entirety of bowl with whole wheat pita bread.
  9. Enjoy!
Image

A pretty cloud I saw outside my window while taking these photos :-).

Beet Pesto

DSC_0043

Confession: my life is more or less plagued with inside jokes surrounding beets. Most normal people have a number of beet jokes less than or equal to 1 (p<0.05). The fact that I have multiple probably tells you something about me… anyways, I digress. Wait, as I am typing this I realized I chose beets as my blog header. Blerg.

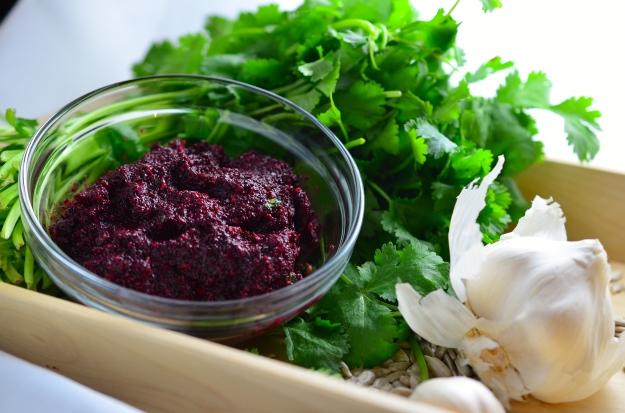
I have stuck to pretty simple things with beets: soups and roasting. But then something magical happened: I put them in my food processor with sunflower seeds, garlic, and cilantro. I had come across a recipe for beet pesto a while ago and I just couldn’t shake the image of the gorgeous magenta sauce adorning some slender noodles. Well, one evening I had diced up some beets and threw them in the oven to put on a salad… but then all of a sudden they were in my food processor! And they were being swirled around in this beautiful food ballet with sunflower seeds, garlic, vinegar, and cilantro. And it was the best thing. Ever.

DSC_0040

Now while making this pesto, my roommate asked me what it has to have to qualify it as a pesto? This was a great question. The Wikipedia has told me that “pesto” means “pounded,” so really any sauce that is made in that way, I suppose, is a pesto. Additionally, it seems ground up nuts/garlic are traditionally at the base of it.

DSC_0045

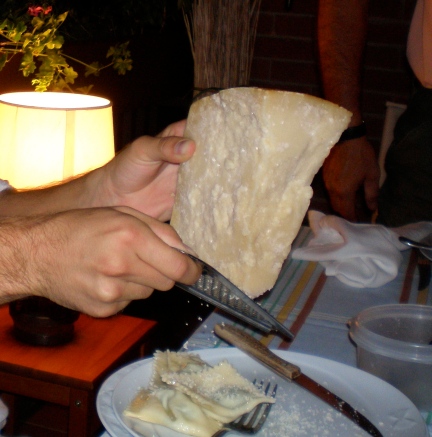
Side story: US customs almost didn’t let me back in the country coming from Italy due to a jar of pesto in my [checked] luggage. They didn’t bat an eye at the 5 kilos of Parmigiano Reggiano or 4 bottles of wine… but the pesto? Packed next to my stuffed animal? That is some fishy business.

Cheese

Enjoying parmigiano in Parma at dinner con i miei genitori italiani. Again, of no concern to the TSA.

In conclusion, a pesto is a ground sauce with a base of nuts and garlic that will get you stopped at customs. I hope this answer satisfies.

But back to something that I know will satisfy: this beet pesto. First of all, it is absolutely stunning. It has the most intense/complex/deep magenta/red color that only nature could produce, which my man made words can’t quite give justice to.  Once you have stopped admiring it, you can use it like you would use any pesto: on pasta, as a dip, as a spread on a sandwich, or really anything else you can imagine! Be creative here! All of my trials have been wildly successful. So I plead that you run to your farmers market or grocer and grab a bunch of beets and get to it!

DSC_0048

Beet Pesto

Inspired by A Veggie Venture

Materials:

  • 1 bunch of beets
  • 2-4 cloves garlic
  • 1/3 cup sunflower seeds
  • 1/3 cup cilantro
  • 1 tablespoon white balsamic vinegar
  • ¼ cup olive oil
  • Salt and pepper

Methods:

  1. Preheat oven to 400F.
  2. Wash and peel beets (save the beet tops! Sauté with a little but of garlic and olive oil) and cut into 1/2” cubes
  3. Spread out evening on baking sheet and drizzle with olive oil and a few shakes of salt.
  4. Roast beets for about 20 minutes.
  5. Place roasted beets with all remaining ingredients but the olive oil in a food processor and process until smooth.
  6. Stream in the olive oil until it has reached the consistency you are happy with.
  7. Add salt and pepper to taste.
  8. Enjoy!


Spiced Roasted Chickpeas for Mediterranean Tacos

My lab has developed this lovely tradition of a lunch club, where once or twice a week one person cooks lunch for everyone. So far our menu has ranged from a spiced wheat berry salad to Indian food to zucchini glory. And part of the reason you haven’t heard from me in a couple of weeks is due to a lunch club related kitchen disaster that happened last week. I don’t want to talk about it.

Ok, if you insist. I tried to make pita bread. Ended up with pita hockey pucks. I tried to made dolma. Ended up with a pile of torn grape leaves and an abundance of super tasty filling. I tried to make falafel. Ended up with a soupy unpalatable mess. I e-mailed my labmates at 9:30 after 4 hours in the kitchen telling them I hated strongly disliked them and I wasn’t bringing them lunch.

But alas, I wasn’t going to be defeated and I was still stuck on the idea of a Mediterranean lunch… but I decided to simplify it. I bought the hummus and some flat breads. And instead of turning the chickpeas into falafel, I decided to roast them and enjoy them in all their chickpeay glory.

Holy moly. I am going to roast chickpeas all the freaking time now. I had to do everything in my power to not eat all of them directly off of the baking sheet. It killed me to transfer the contents to a tupperware container and have to wait 18 hours to eat them. BUT, after those 18 hours… I got to smother them with garlic hummus, adorn them with fresh veggies and a squeeze of lemon juice, and wrap it all in some fluffy flat bread. And then I put it all in my mouth. And it was glorious.

I kept the flavors pretty standard Mediterranean with some cucumbers, garden fresh tomatoes, olives, red onion, mint, and lemon juice. My Danish labmate gave me a 5.3 out of 6 (silly Danish scale)… but only so that I would keep trying. This was some seriously good lunch time eating and so simple. Save your tastebuds from the work week lean cuisine monotony with these yummy Mediterranean Tacos!

 Roasted Chickpea Mediterranean Taco
Materials:
For the Roasted Chickpeas
  • 2 cans chick peas, drained and rinsed
  • 2 tablespoons olive oil
  • 3 tablespoons taco seasoning
  • juice from 1 lime
For the Rest
  • 1 package flatbread
  • Your favorite hummus
  • 2 small cucumbers, diced
  • 1/2 red onion, diced
  • 2 tablespoons fresh mint, minced
  • 2 tomatoes, diced
  • 1 cup lettuce, torn apart
  • assorted olives
  • 1 lemon
Methods:
To make the Chickpeas
  1. Preheat the oven to 350 degrees.
  2. Toss the chickpeas with the remaining ingredients and allow to marinade for about 30 minutes.
  3. Spread out evenly in 1 layer on baking sheet and place in oven for 45 minutes, stirring halfway through.
To assemble the tacos
  1. Smear flatbread with hummus, top with remaining ingredients as desired, top with a squeeze of fresh lemon juice.
  2. Enjoy!

Weeknight fancy: Herbed zucchini and blossom pasta

Beautiful flowers from my beautiful bestie, Awesome A :-D!

Wow. I am going to jump right into it with this post: this dish is one of my favorite things I have made/eaten in a while. Sure, some of my pleasure from this dish is derived from the fact that many of the ingredients came straight from my garden (my first harvest!), but it was also straight up delicious. Delicious to the point where even Reasonable R kept talking about it… almost as much as he talked about the jalapeño beer cornbread.

Now, what is this magical dish I speak of? Let me break it down. First, I harvested a few baby zucchini… nay, adolescent zucchini and their attached blossoms this week (in addition to a few childless male blossoms). They were delicate and beautiful and perfect and I loved them. Next, I took a few steps over to my herb garden and snipped off some of each… parsley, pineapple sage, mint, basil, and lemon thyme. Finally, I strolled on to my CSA box to complete the dish with a large juicy tomato (since I probably still have a few weeks before my dozens of tomatoes turn red). The only pantry items that supported this dish were some quinoa pasta and some tofu. Wait, did I say tofu? I meant homemade tofu ricotta that fooled Realistic R. SO. DELICIOUS. I am definitely making that more often.

The zucchini blossoms add such an awesome floral note to it, the tofu gives the dish a nice silkiness, and the herbs just give it so much flavor. The star of the dish though? The zucchini. They were so tender and were an absolute pleasure to have in my mouth. My zucchini plant is going to be producing prolifically this summer, and I couldn’t be more excited.

I steamed up a side of broccoli and sat down with my gorgeous meal to catch up on the last couple episodes of the Bachelorette. Don’t judge, please… especially when I am here to share with you such a delicious, nutritious, and easy weekday meal! Oh, and did I mention the whole thing took maybe 20 minutes to prepare?

Herbed Zucchini and Blossom Pasta with Tofu Ricotta 

Materials:
Tofu Ricotta
  • 8 oz extra firm tofu
  • 1 tablespoon lemon juice
  • 1 tablespoon olive oil
  • 2 teaspoons italian seasoning
  • 1 teaspoon nutritional yeast
Remaining Ingredients
  • 1 lb your favorite pasta
  • olive oil
  • 3 small zucchini, sliced into thin rounds
  • 3 cloves garlic, minced
  • 1 tomato, diced
  • 1/2 cup assorted fresh herbs, minced
  • 3 or 4 zucchini blossoms (or a few more if you have them), chiffonaded
  • salt
  • pepper
Methods:
For the Tofu Ricotta

  1. Mash the block of tofu with your hands in a mixing bowl until is has sufficiently crumbled.
  2. Add the remaining ingredients and continue to mash with your hands until is resembles ricotta cheese.
  3. Set aside while you prepare the rest of the dish.

For the Pasta

  1. Cook pasta accordingly.
  2. While the pasta is cooking, heat up a couple tablespoons of olive oil in skillet over medium heat.
  3. Add the garlic and zucchini and sauté for about 2 minutes, just until the zucchini is barely softened.
  4. Gently toss together the cooked pasta, lightly sautéed zucchini, tomato, herbs, zucchini blossoms, and tofu ricotta with a light drizzle of olive oil and a shake of salt and pepper to taste.
  5. Enjoy immensely!

Weeknight fancy: mushroom bourguinonne

I love when cleaning out the fridge turns into a gourmet meal. I had some mushrooms that were on their way out, some leftover red wine from a recent party, and some fresh rosemary I wanted to finish up. I immediately thought of making mushroom bourguinonne. This is a recipe that I learned at a cooking class that I took a few years back. It really is a simple recipe, made with simple ingredients, that moonlights as gourmet french food.

So even though I may have had this gorgeous meal in front of me, I made it will still sweaty from the gym, and ate it cross-legged on the couch while catching up on this past season of Bones.

Let’s get back to the mushrooms for a second though. Why would you make beef bourguinonne, when you can make mushroom bourguinonne? As the beef stews, it is breaking down into all sorts of carcinogenic compounds (heterocyclic amines) that are going to go into your body and wreak havoc. Particularly in your colon. Mushrooms are going to do the exact opposite. Recently, a study conducted in China concluded that woman who included mushrooms regularly in their diet had a 64% reduced risk of developing breast cancer. And those that also drank green tea? A 90% reduction! Both mushroom polysaccharides and green tea polyphenols act as scavengers to go through your body, soaking up any harmful compounds that may be in there. The key here is that these naturally bioavailable compounds can go in, do their thing, and then are automatically excreted from the body, taking with them the bad guys.

In addition to mushrooms being good for you, there are currently some great varieties of mushrooms in season! Please head over to Delectable Musings for some other great seasonal eats :-)!

Pretty cool, huh? So put on a tea pot of green tea, and get to chopping those mushrooms!

Mushroom Bourguinonne
Materials:
  • olive oil
  • 2 yellow onions, chopped
  • 2 lbs mixed mushrooms, quartered
  • 4 cloves garlic, thinly sliced
  • 1/4 all purpose flour
  • 2 1/2 cups dry red wine
  • 1/4 cup soy sauce
  • 1 tablespoon fresh rosemary, minced
  • 1 tablespoon honey
  • 2 tablespoon balsamic vinegar
  • salt
  • pepper
  • parsley to serve
  • quinoa pasta
Methods:
  1. Heat up a oil in a large skillet over medium-high heat.
  2. Saute the onions until just translucent, about 5 minutes.
  3. Add the mushrooms and garlic and cook until the mushrooms begin to release their juice, about 5 more minutes.
  4. Sprinkle with the flour and cook for 1-2 minutes.
  5. Pour the red wine in and stir well.
  6. Add the soy sauce, rosemary, honey, and vinegar and stir.
  7. Cover, reduce heat to medium-low, and simmer until the sauce has reduced and thickened, about 15 minutes.
  8. Salt and pepper to taste.
  9. In the meantime, cook your pasta accordingly.
  10. Serve mushrooms over pasta, garnish with parsley.
  11. Enjoy!
    • Sit back, relax, and let the mushrooms do the work now!